About this Blog


This blog is designed for me to try and investigate pros and cons of sugar craft materials and techniques.
I plan to have 3 types of posts: experimental, how to and product reviews.
If you have any questions/suggestions then please comment and I will try and get back to you.

Sunday, 4 August 2013

Shipwreck Cake

My Shipwreck Cake ...


I regularly babysit a delightful little boy who is having a pirate themed 4th birthday at soft play. I have decided that for his birthday cake I will make him a pirate figure, with a treasure chest, on desert island, complete with palm tree, and a boat ... All of which will be as edible as possible - of course! I'm also trying to give the cake a childish perspective. You may wish to add a palm tree to yours.

You will need:

Shallow Round Chocolate Cake (8" diameter, 1½" high)
White Chocolate Butter Icing
Sandy-Brown fondant Icing
Demerara Sugar
Grey Fondant Icing
White Royal Icing
Aqua Royal Icing
Maltesers
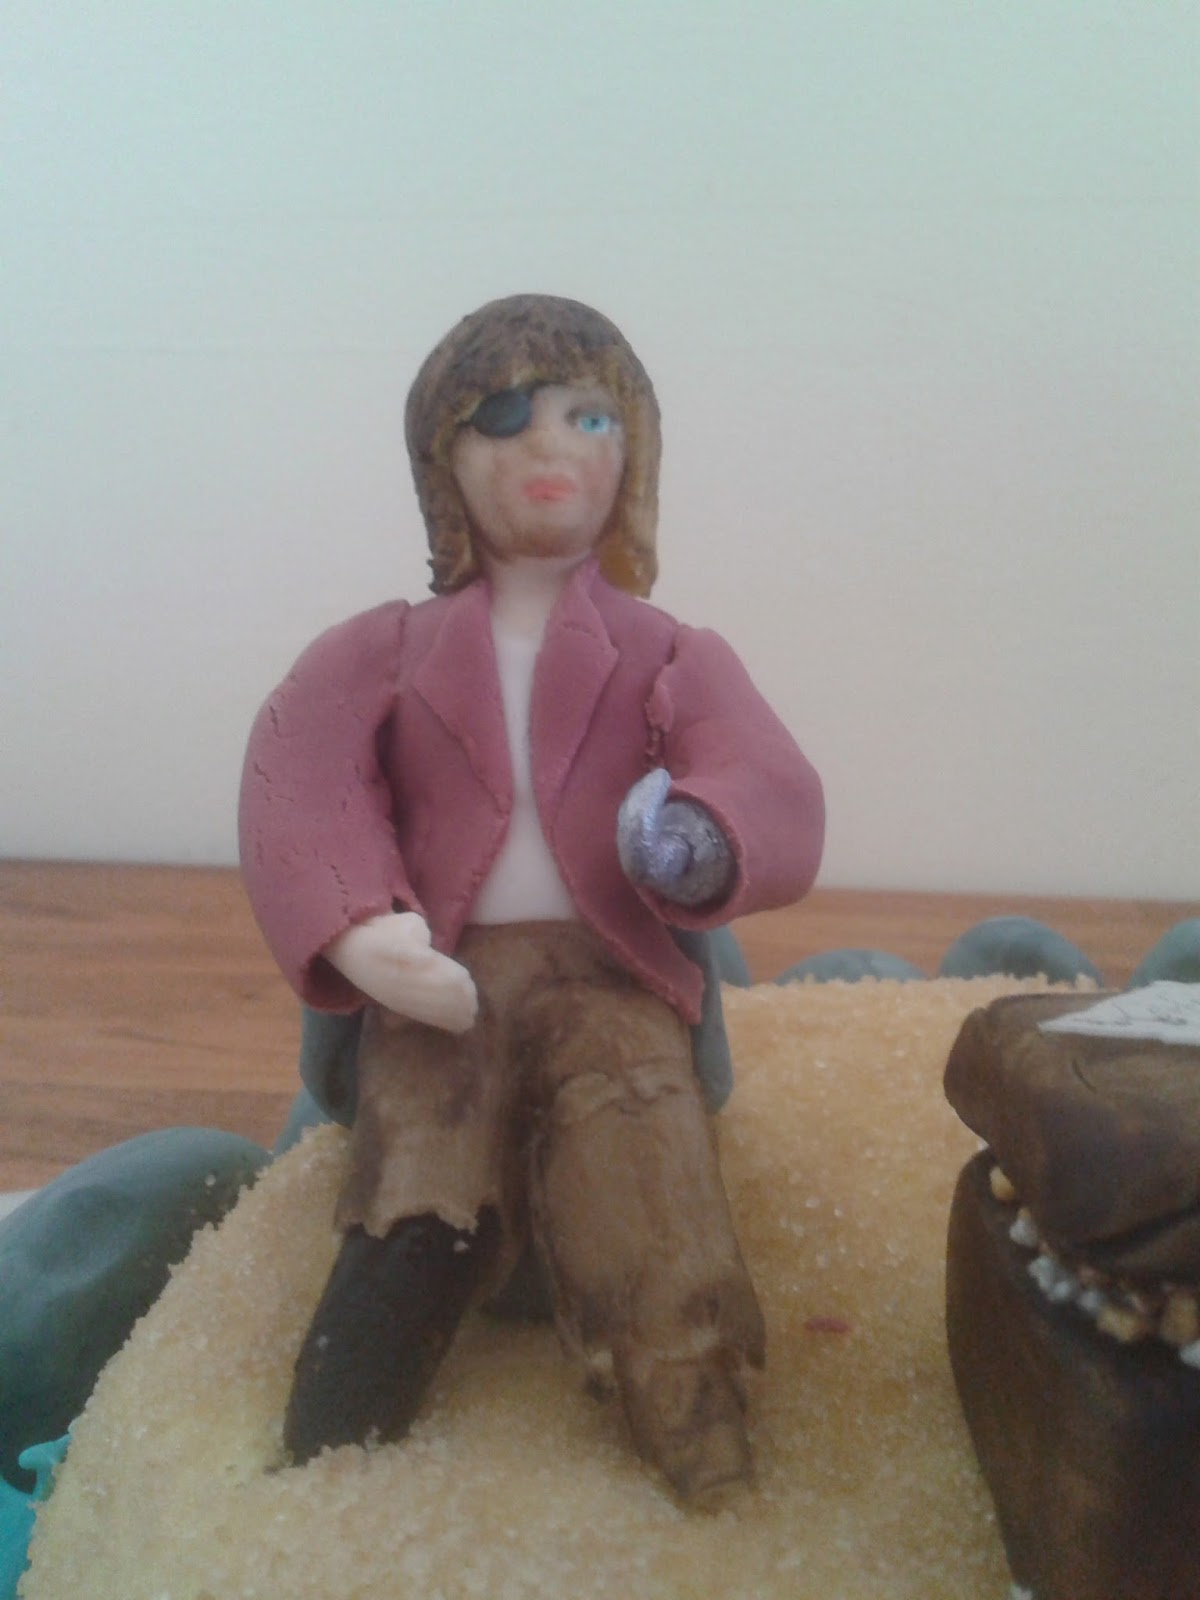
Pirate Figure
Boat and Treasure Chest
Cake board (10"x14")

Note: Whilst this cake is rather elaborate, it is also quite small. If you want a bigger cake, then you can add a larger tier under the island, ice it blue and add 'under water' features to the side (e.g. fish, seaweed, octopus, shark etc.) and sit the boat on top of the bottom tier. and the Island can be stacked (using a direct stacking method) off centre on top of the bottom tier.

Firstly cut the 8" cake so the sides slope down to create a beach. Do this so you have approximately a 6" diameter circle still intact and level on top, it doesn't matter if the slope isn't even all the way round. you may wish to add features to the beach such as bays and spits. I chose to add a cliff face round the back and a rocky spit off to one side which my boat was shipwrecked onto.

Cut the cake horizontally and add the white chocolate butter icing in between the layers.

Roll out the Sandy-brown fondant icing and cover the cake, trim to size. Position the cake on the cake board, secure in place with a dab of butter icing. Brush a thin layer of edible glue over the cake and sprinkle the Demerara sugar over the top for a sandy effect. Remove any excess from the cake board.


Next I made the cliffs. Using grey fondant icing that had uneven colour I shaped 'rocks' to go around behind the island where my vertical face would be. I extended these into the ocean to form a rocky outcrop my boat would be wrecked upon.


I also formulated a little stone 'seat' for my pirate - so he stayed upright!

Ocean:

Cover the cake board with the royal icing using a silicone pastry brush to give an uneven surface, push the 'water' right up to island to 'seal' the cake in. Position the boat - whilst the coating is still wet. Then add white royal icing via a piping bag with a wide round nozzle where you want the wave crests to be.


Using the silicone pastry brush by dabbing and 'picking up waves create the texture of the ocean.


Pirate Flag:

Print off a skull and cross bones with black background so that a black rectangle the height of the skull and cross bones plus border and twice the length plus border is black. Cut out this shape, and fold it in half. Place a cocktail stick into the fold and glue the rectangle shut to form a flag. Trim if required


Map:

I used an edible ink printer for my map, I printed the design out onto edible wafer paper and trimmed the excess.


Palm Tree

Here's a palm tree I made for this cake, and how I did it, but I didn't actually end up using it.


For how to make the cake is here, for the pirate, please see here. The post for the boat and treasure chest is here.

You will need:

Plastic Dowel
Brown fondant (uneven colour) with Karaya Gum
Green fondant with Karaya Gum
Rolling Pin
Green Royal Icing
Card/paper

I started by making the tree trunk, My ball of fondant was coloured to light brown, I then mixed in  Karaya Gum (see here) to strengthen the icing. Once this was fully kneaded in, I began to mix in more dark brown food colouring, but instead of kneading it until the colour was even I stopped when a marbled effect could be seen.


I rolled the fondant into a sausage shape that was fatter and slightly longer than my dowel that I am using to reinforce the trunk.

Note: I am using a plastic hollow dowel, which has a relatively large diameter. I believe it is possible to use a smaller dowel - although I haven't tried it yet - if I was going to do a small solid dowel I would wrap the wires for the leaves around the dowel before the next step.

I cut the sausage shape into chunks and remoulded them slightly before pushing them onto the dowel. Once they were all onto the dowel I gently rolled the trunk on my work surface to help the trunk sections merge slightly.

The plastic dowel should emerge from the base of the tree, as this will be used to 'root' the tree into the cake. Set up the trunk so that it is vertical and stable.


The leaves will need supporting as they dry, to do this I used boxes and rolled up kitchen towel held into shape with rubber bands. Sort out how you will support the leaves before you begin to cut them out.


Firstly cut paper/card into an elongated leaf shape for a template. Roll out the green fondant icing and use the template and a sharp knife to cut out the leaf shapes, add slits to the sides of the leaves, each diagonal sloping towards the trunk, the slits can be fanned slightly for added depth. You'll want about 12 leaves for the tree. Cover the icing to stop it from drying out.

Into the top of the trunk I placed 4 wires and shaped them to give the curled leaf shape. I draped the fondant over the wires, which then sagged until they rested onto the provided support. I then added a dab of green royal icing to help cement the leaves into place.


Next I positioned the 8 wires for the top layer of leaves. Cut the leaf shapes and draped them over the wires.


Another dab of green royal icing to help cement the leave in place was added


And to hid the colour differential I added a circle of the green fondant to the centre top of the tree. The whole tree was then left overnight so the royal icing could set firm and the fondant could fully dry. Then the supports were carefully removed.

>finished tree picture coming soon<

Small Pirate Ship and Treasure Chest

Also relating to my 'Shipwreck' cake I'm going to explain how to make the boat and chest.


For the Palm Tree see here. For the pirate see here.

I made the boat and chest at the same time with big similarities in the method, hence there is only one post for both items.

You will need:

White or light brown fondant
Bamboo skewer or 2
Paper 'sail' with printed skull and cross bones
a little oil
Dark Brown food paint (see here)
Greaseproof paper.
Square/rectangular cutter (optional).

Firstly use origami to make the shape of the boat's hull out of greaseproof paper. You could use something else as a mould if you wanted to. I used a boat as explained in: Martin's Origami Boat.

Turn the boat hull upside down, if using an origami boat give the shape support, using something like kitchen towel, bunched up inside. Roll out the fondant and drape it over the hull. Trim to size and add a nook for the anchor to come over the bow.

Using the remaining fondant, mould into a crease free ball and push into the cutter, or just shape into a treasure chest. Cut off the 'lid'.

Paint the icing with the brown food paint, building it up in layers, allow the paint to dry in between each layer. Personally I think it looks better is the brown paint gives an uneven coverage which is why I do it this way.

Once one side is painted and dry, turn them over and paint the other side.

The bamboo skewer can be gently pushed through the base of the boat (when the hull is sitting on the flat surface) to form a hole. Trim the skewer to the desired length of the mast using a sharp knife or pair of scissors. Allow 1-2cm of length for embedding into the cake or, if it will not sit on a cake add a cylinder of fondant, painted to match the boat, onto the skewer near the base, to give the skewer more lateral support.

The remainder of the skewer (or another one depending on the length of the mast. can be cut to provide top and bottom support for the square sail, lash them into place using brown cotton thread (search for west country lashing if you're unsure how to do this). The mast can also be painted with the brown food colouring if desired.

Check the size of the sail with respect to the skewers and trim if required, use a hole punch to add 4 holes for the bamboo skewers to pass through. Brush the paper with a little oil (both sides) then gently grill. This will turn the paper semi-translucent (so the skull shows on both sides) and then brown it slightly to give an aged effect. Leave to cool and remove excess oil from the paper using kitchen towel.


Wait till your boat is on the cake to assemble. If your boat is going to sit on the cake board (i.e. there won't be cake underneath it you'll need some edible glue to stick the cylinder of fondant to the rest of the boat. If not just insert the skewer through the hole in the bottom of the boat 1-2cm into the cake and you're done.


Edible Glue can be used on the top of the treasure chest's base to secure gold and silver sprinkles for the treasure effect. I brought my sprinkles from Sainsbury's they have pots with 4 divisions each containing different gold and silver style sprinkles, one of these looks like gold, silver and bronze nuggets - perfect!

Stick the lid of the chest on so it is ajar, add a thin strip of glue along the back, position the lid so it's propped up on the treasure.


Pirate Figure

This is part of the Shipwreck Cake


The pirate figure was made using the smallest child from the PME people moulds. This made it slightly boyish which I thought might soften the pirate's demeanor (he only likes nice pirates), and will hopefully will add a childish perspective to the cake.

To make the Palm Tree see here, and the treasure chest and the boat here.


So ... Pirate figure .... This is going to be very similar in some respects to my post on how to make a Merida Cake Topper, however, I haven't finished making Merida yet, so that post is still only half finished. Forgive my copy-paste repetition between these posts if you've already read Merida's or are going to!

The Moulds


The moulds were sprayed with cake release spray to ensure they released the icing at the end. This was in line with the manufacturers instructions to oil the moulds before use. See also my icing and moulds experiment.

Fondant colours:
  • Pale skin-coloured (the face is darkened by painting later)
  • Black
  • Dark Red
  • Light Brown
  • Light Grey
  • White
  • Green
  • Yellow

I strengthened the skin coloured fondant using Tylose Powder (see here).

I rolled a small amount of the skin-coloured fondant into a crease free ball, rolled it out slightly and then pressed it into the cavity for the face. I kept working the fondant until I was sure it had got into all of the details and come up the sides to fully coat the head. I then formed a second ball of fondant and pushed that into the head mould to fill it. The body and neck were also filled with balls of skin coloured fondant, pushed into place using the same method. The reverse of the mould was also filled in this way. The two halves of the mould were pressed together firmly, the mould was opened and excess fondant was cut away, the mould was then reapplied to the fondant shape, and whilst the two halves were being pushed together, a cocktail stick inserted from the open end. The figure was left in the mould until the other features had been created, it was then taken apart to remove the soft figure. The seams were then softened using a bone tool.

Leaving the figure in the mould minimised drying whilst the other pieces were being made.

I found that using a ball of fondant to "coat" the mould before filling the bulk of the mould gave a crease free finish to the figure's skin.

A similar approach as with the torso was taken with the legs and arms. The the left hand was then cut off and replaced with a hook sculpted in light grey fondant.


Using wire and a cockatil stick I assembled the figure; and positioned the legs etc. small sections of the arms were removed to improve the appearance once positioned. Likewise the legs had wedges removed to help the positioning of the figure into a sitting position - I feel standing is a little ambitious for my first figure.

The body parts were then set aside (individually) to dry.

The shoes were added to the feet and trousers to the legs. This was rather fiddly, I did actually start this while the figure was still soft - and I am glad I did, my easiest option was to part the legs so I could smooth the icing join down and form the inside leg seam.


For dressing the pirate, I started with a white shirt. I used a template that came with the moulds to create this. As my pirate would be wearing a jacket I only made the front half of the shirt.

The body and legs were glued together using edible glue, and then a dark red jacket was then added to the torso.


The body was then left overnight to dry, during this time the hook was painted using metallic silver food paint.

I live in the UK and the weather was unusually hot, my flat was at about 35 degrees Celsius, and this made rolling out the icing thinly without getting it too dry or sticky very challenging. I therefore rolled it out between 2 sheets of greaseproof, which was very helpful when handling the thin icing, I found this so useful I think I will continue doing this, even when the weather is cooler.

The arms were dressed with the sleeves of the jacket and the seams softened. The arms were then attached to the body using edible glue, and supported using various objects whilst they dried.

Unfortunately I had part of a leg fall off, luckily pirate's can have wooden legs; so I replaced it with one of these!

I mixed up paint colours using food colouring diluted with vodka. for the whites of the eyes I used icing whitener mixed with a couple drops of vodka. Alternatively you can use rejuvenating spirit and/or tint colours. See my edible paints post here.

To give the facial features and colour, I begun with the eyes. I painted them white, then, once they had dried the blue iris's were painted on, and then, after drying again, the pupils added. Using a few coats of   light brown paint I then painted on the eye lids.

For the hair, I produced a template from greaseproof paper, I used this to shape a thin piece of yellow fondant and then painted it with a thin wash of brown.

Monday, 22 July 2013

Edible Paints

There are a few ways you can create edible paints for icing.

If you're using the liquid food colours available in supermarkets (not concentrated) you'll probably be able to paint them strait on without diluting, but the gel/concentrated colours would need thinning and if you want to pick a particular shade then there isn't always a food colour to match.

The best way to work out how to make your paint is to first decide how you will give it colour, there are 3 main ways of doing this:
  1. Tint Powder
  2. Lustre Dust
  3. Food Colouring
You then need to dilute the food colouring/dissolve the powder/dust to the required consistency and to some extent shade, this can be done with rejuvenator spirit (99.9% iso-propyl alcohol) or vodka.

For white paint, use Icing Whitener instead of a tint.

Then just paint on to the cake, and allow to dry.

Thursday, 11 July 2013

Chocolate Butter Icing


100g of chocolate (white, milk or dark)
250g of butter
500g of icing sugar
approx. 2 tbsp of milk

Melt the chocolate and set aside to cool. Beat the butter (which should be at room temperature) and then gently pour in the melted chocolate beating as you go. As the chocolate is cooled it should not melt the butter, but if it does then all is not lost, it will still taste fantastic but will loose some of the luxurious silky texture. Add the icing sugar a scoop at a time, beating it in as you go. Add the milk in order to soften the icing to a workable texture. This will also help it maintain piped shapes as it helps it "dry".

Tuesday, 2 July 2013

Strengthened Fondant for Modelling


2 inch diameter ball of fondant
2 pinches of Karaya Gum (Tylose Powder of Gum-Tex)

Flatten the ball, add your Karaya Gum and knead it into the fondant until mixed.

Note: This will dry quicker and harder than regular fondant.